


How to Implement Identity Management for Microsoft Power Platform Applications
- December 10, 2022

Identity Management describes how a Power Platform artifact provides access to different groups of users or different roles. If we look at a fictitious PowerApps application used to manage orders, there could be three different roles involved: Contributors, Visitors and AppAdmins. Those three roles require different access permissions to the app, e.g., Visitors can only view data records, whereas Contributors can create and update records. AppAdmins might require access to additional sections of the app to configure the app. Those sections must be inaccessible to all other roles.
Managing roles in Power Platform artifacts, as described above, is called Identity Management, and this blog post provides implementation options and valuable best practices for developers and business analysts.
Microsoft Power Platform Permissions
Before having a closer look at how Identity Management can be implemented in the Microsoft Power Platform, let us look at how Power Platform is handling permissions and roles. The first important fact is that PowerApps applications are executed based on the current user’s credentials. This means that PowerApps applications always utilize the same access privileges as the user running the app. There is no way to elevate privileges (often called Impersonation) or assign privileges to the app only. In Power Automate, things can be different. Although Power Automate flows are usually executed based on the current user’s privileges as well, there are some exceptions. Prominent examples are flows triggered based on a schedule (Scheduled Flows) or events (Automated Flows).
As Identity Management does not necessarily apply to those types of flows, they are not discussed in this blog post.
Roles and Permissions
To understand why Identity Management can be an essential topic for a PowerApps application, let us look at a fictitious application MyApp and two fictional users: UserA and UserB. From a technical perspective, both users enjoy the same access privileges. Both have the same access permissions to the underlying data repository of the app, and the app is shared the same way with both users. Does this mean that UserA and UserB share the same user experience? Does this mean that they can use MyApp the same way? Not necessarily! UserA has access to a specific screen within MyApp which allows configuring the app. UserB does not have access to that screen. How is that possible if both users share the same permissions? The reason is that the app has been designed to recognize Roles. MyApp uses two (2) roles internally: Contributors and AppAdmins. Both fictional users are Contributors, but only UserA is also an AppAdmin. These internal roles are called Identity Management, and this blog explains how to implement Identity Management in Power Platform.
Building Blocks of Identity Management
Identity Management, as described in the previous section, defines internal roles which unlock additional screens in PowerApps or provides specific users with additional (or enhanced) functionality. Identity Management is founded on five pillars which built upon each other:
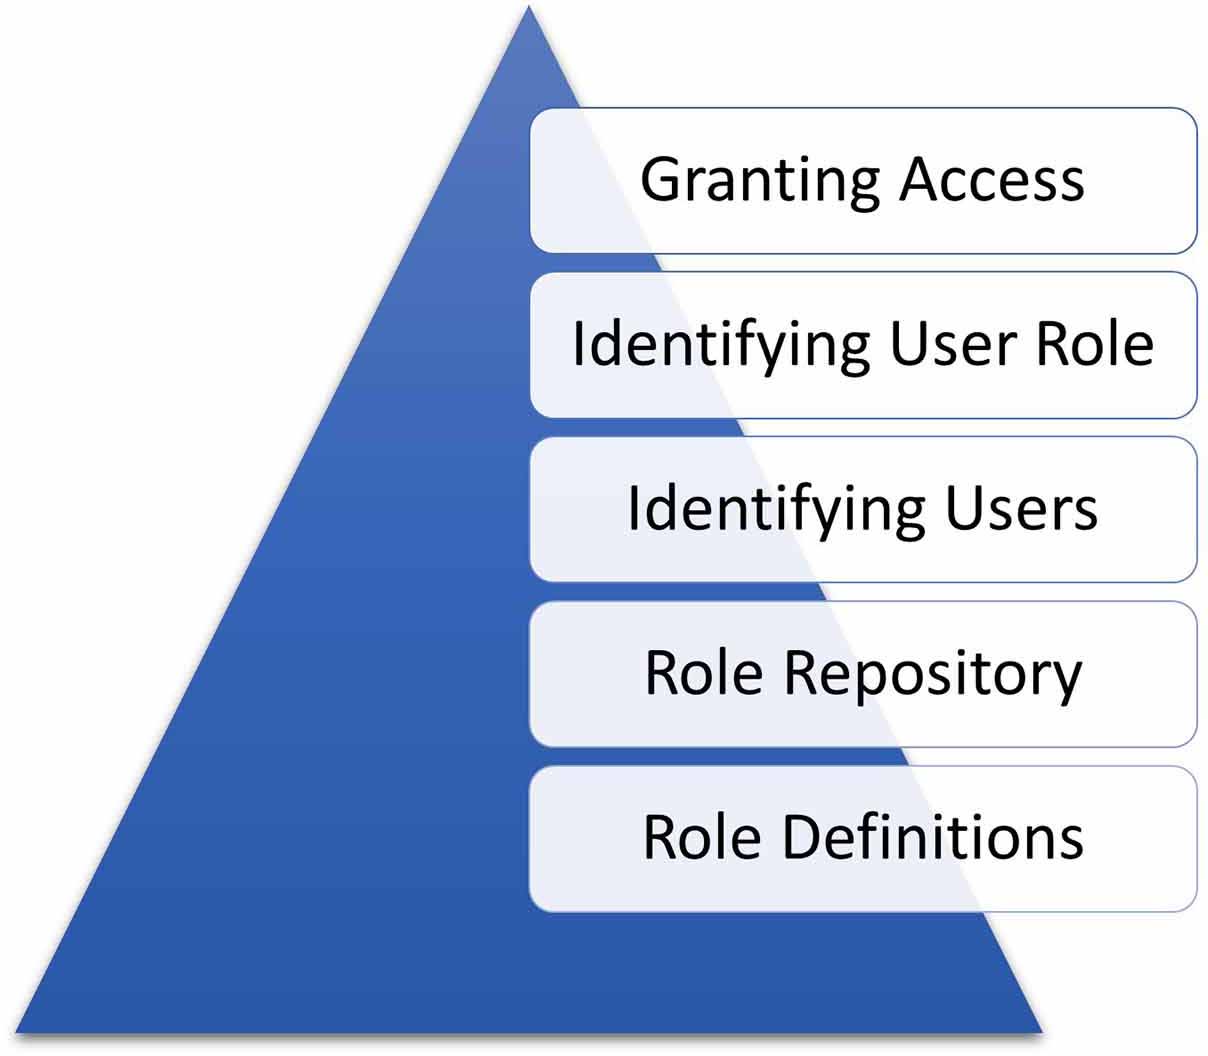
Role Definitions: Suitable roles must be identified before considering any implementation details. This is usually done during Requirements Discovery sessions. A Business Analyst (BA) works with stakeholders and SMEs to identify roles required for a specific application. As a starting point for any related workshops, I usually suggest the three typical roles used in SharePoint:
- Site Owners: managing sites, site settings and users
- Contributors: creating, updating and managing data items
- Visitors: casual visitors to the site with Read-Only permissions
Those three standard Microsoft SharePoint roles can be easily transferred to application roles where
the Site Owners become AddAdmins (or AppOwners). But this is just a general example of potential roles in a Power Platform artifact. The Business Analyst must work with stakeholders, SMEs and business process owners to identify roles needed for a specific application. It is not uncommon that more roles are required. This can happen if, for example, the Power Platform artifact requires internal approval processes for data records (or documents) that can only a specific group of users can approve or if an artifact should provide enhanced (or additional) functionality to a specific group of users.
The outcome of these workshops is a list of roles, their permission levels or functionality and role-specific user repositories (often called Role Repositories) based on a corporate naming convention. The best tool to work on internal roles is a Microsoft Excel sheet. It can be created and updated during the Requirements Discovery workshops and become official project documentation once the roles are approved.
Role Repository: Once roles have been identified and approved by stakeholders and SMEs, a repository needs to be identified, which is used to manage roles and user groups. Azure Active Directory (or Dataverse/Dynamics) would be an ideal repository for professional Power Platform solutions. However, for smaller solutions (like single PowerApps applications) that might not benefit from professional and sophisticated Identity Management, roles can be managed based on SharePoint Security groups (or even a SharePoint list for all roles). Although this comes with some disadvantages (regarding data security and data isolation), it would be a viable option for a basic PowerApps application, which requires just a few essential roles. Here is an example of how identified roles and assigned functionality can be mapped to different repositories:
| Role | SharePoint Group | Azure Directory Group | Access App Settings | Update Data Records | Delete Data Records | Approve Documents |
|---|---|---|---|---|---|---|
| Contributor | MyAppSite_Contributors | grpPowerPlatform_MyApp_Contributors | No | Yes | No | No |
| Visitor | MyAppSite_Visitors | grpPowerPlatform_MyApp_Visitors | No | No | No | No |
| AppAdmin | MyAppSite_Owners | grpPowerPlatform_MyApp_AppAdmin | Yes | Yes | Yes | No |
| Approver | MyAppSite.Approvers | grpPowerPlatform_MyApp_Approvers | No | Yes | No | Yes |
However, Azure Active Directory is the preferred option for most professional Power Platform solutions. The following list provides the most essential reasons why Azure Active Directory is the preferred repository for Power Platform Identity Management.
- Azure Active Directory is centrally managed by corporate IT and directly connected with the corporate user repository.
- Azure Active Directory groups will not contain orphaned user accounts as user accounts derive directly from the main OU (Reference), which is managed by corporate IT.
- Azure Active Directory groups are decoupled from the Power Platform solution and environment and often managed by a small group of application owners.
- Adding new users often requires a request and is associated with an internal process. This adds another layer of security regarding who gets access to the solution and/or data repository.
- Azure Active directory groups can be reused for other purposes, like sharing the Power Platform solution with group members or granting access to supporting reports hosted in PowerBI.
- 6.Power Platform solutions can be created to support a quick and easy switch between Azure Active Directory groups, which is essential if Power Platform solutions are being migrated between environments (e.g., DEV / QA / PROD environments).
User Identification
Now that roles have been identified and approved and functionality has been assigned to those roles, the next important step is how to identify users. As explained in a previous section of this blog post, PowerApps always utilizes the current user’s permissions. This also means that PowerApps always knows the current user. So how can developers retrieve information about the current user, like name, department or email address?
There are three common options:
- Built-in User() function call: this option is built into PowerApps. Developers can use this function call to retrieve a record with information about the current user. The record includes email, full name and image. This function call sometimes has issues with more complex corporate Active Directories, and the returned user information is very limited, so this would be my second-best option. (Reference)
- Office365Users connector: This connector connects to a corporate Active Directory and returns a record with information about the current user too. This record, however, contains much more user properties. It also does not have issues with more complex corporate Active Directories, making this option my preferred way of retrieving user properties. (Reference) .
- AzureAD connector: this connector works similarly to the Office365Users connector. If provides a GetUser() call, which returns a subset of the information provided by the Office365Users connector. (Reference)
Before deciding which connector to use, it is advisable to check with corporate IT if the anticipated connector can be used, if additional permissions are required or if there are any corporate Governance policies preventing users from using a specific connector.
The following screenshots provide a code sample for using the first two options explained above. Using the AzureAD connector is very similar to what is shown in Figure 2.


Figure 1: User() method; Figure 2: Office365Users connector
In both examples, local variables store information about the current user, offering better performance than multiple subsequent calls. Basic error handling has also been implemented to ensure that an error message is displayed in the unlikely event of a problem using one of the options. The with function in PowerApps can be used to improve the provided code snippets even further (Reference).
Identifying User Role The section above on User Identification explained how the current user of a PowerApps application could be identified – including retrieving additional user account properties (like email or department). The current user’s role can be determined based on the identified user profile information.
Let us return to the fictitious PowerApps application MyApp introduced in a previous section. Let us also assume Azure Active Directory groups are used to implement roles. How can we check if the current user is an AppAdmin, for example?
You might have guessed the answer already! We need to check if the current user is a member of the Azure Active Directory group grpPowerPlatform_MyApp_AppAdmin – if we stay with my fictitious example a little longer. Technically, this requires another connector: the Office365Groups connector. This connector allows for checking the membership of Active Directory groups (Reference). This connector provides the function ListGroupMembers() (Reference) that can be used for this purpose. The documentation states that a single parameter is required: the group id! This is the unique ID of the Azure Active Directory group, and there are two ways a developer can get this ID:
- From the corporate IT specialist who created the group
- .From the site My Groups within Microsoft 365 (Reference)
Although the first option appears to be the best because the corporate IT specialist will most likely confirm that an Azure Active Directory group was created and can provide the unique group id, however, if a developer is a member of the new group, the second option might be the fastest way to obtain the group id. The developer needs to hover with the mouse over the group’s name, and the ID will be displayed in the tooltip at the bottom of the screen or click on the group and copy the group id from the URL.
Note: the official documentation refers to the group id, whereas the mentioned My Groups page uses the term object id. Group id and object id can be assumed to be the same for this blog post. The following image provides an example of how to use this call:
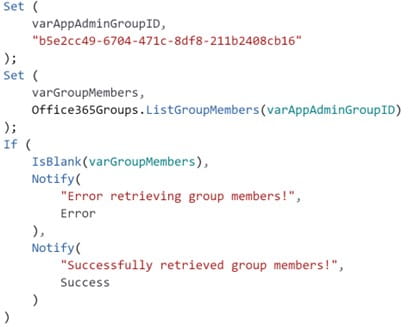
Figure 3: Retrieving Active Directory Group Members
Developers might agree that the above snippet would work, but it is not ideal because it retrieves all group members instead of checking if the current user is a group member. Let us enhance the code snippet accordingly:
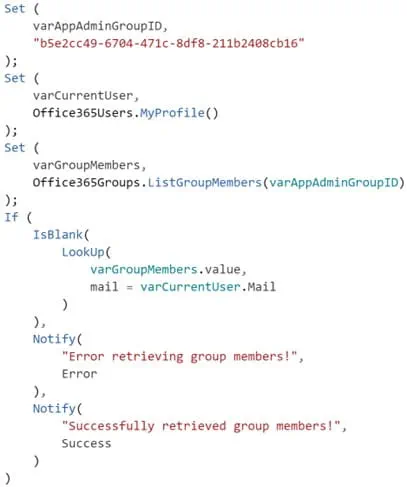
Figure 4: Checking Group Membership with the Office365Groups connector
The above snippet has been provided without performance improvements and error handling to enhance readability. ListGroupMembers() returns a record containing a table with the user profile properties. That is why the additional .value property needs to be added. The current user is looked up based on the email address, which is assumed to be unique.
If the current user can be found, the user is assumed to be a member of the AppAdmin role; otherwise, not. This is a valid assumption as the above code checks the role repository for AppAdmins.
Another option is to utilize the AzureAD connector and its CheckMemberGroupsV2() function. This option allows checking if the given user is a member of one of the given Azure Active Directory groups.
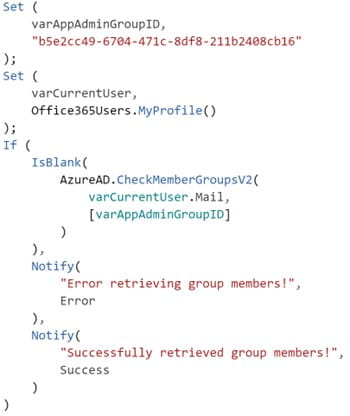
Figure 5: Checking Group Membership with the AzureAD connector
The advantage of the above code snippet is that it does not require looking up a user in a returned table. CheckMemberGroupsV2() returns the ID of the Azure Active Directory group if the given user is a member of the given group. As the second parameter of CheckMemberGroupsV2() is a table, multiple group IDs can be provided in case multiple Azure Active Directory groups should be checked. However, this means that the response handling might become more complex because a user can be a member of multiple groups. (Reference)
Granting Access
In the previous section, I explained how to check if the current user is a member of a specific Active Directory group. The last step is to unlock additional screens and/or functionality based on the current user’s role.
To implement this, developers can rely on the OOTB properties of almost all user interface elements in PowerApps.
- Visible: a UI element can be hidden based on the role of the current user.
- DisplayMode: a UI element can be set to Edit, View or Disabled based on the role of the current user.
- Color: the colour of a UI element can be changed based on the role of the current user.
Here are a few examples to illustrate options:
- An icon is placed next to the current user’s name to indicate the user is an AppAdmin. This can be achieved by utilizing the Visible property. Defaulting to false, visible is set to true if the current user is an AppAdmin
- Prevent users from submitting a form if they are not members of a specific role. This can be achieved by setting the DisplayMode property of a form to Edit if the current user is a member of the role; otherwise, set DisplayMode to View.
- Make a specific screen available to AppAdmins only. Most screens are accessed by clicking on a button. Switch the DisplayMode of the button to Disabled if the current user is not an AppAdmin; otherwise, enable the button
The examples above are just a few basic examples of how the visibility and usability of user interface elements in PowerApps can be set based on the current user’s role. In other words, in most cases, the OOTB UI element properties Visible and DisplayMode offer good options to implement a role-based behaviour.
For more complex apps or apps that need to act more dynamically, a role-permission matrix can be implemented by using a table. This significantly extends the development effort but reduces Identity Management-related maintenance by updating the role-permission matrix instead of updating multiple screens. Here is an example of what this could look like:
| Role | AdminIconVisible | ConfigPageVisible | CreateContact | UpdateContact | DeleteContact |
|---|---|---|---|---|---|
| Visitor | false | false | false | false | false |
| Contributor | false | false | true | true | false |
| AppAdmin | true | true | true | true | true |
The above matrix is created as a table. Based on the role and the current functionality, the app can retrieve parameters from the associated cell to influence UI elements. Let us assume that the fictitious MyApp displays a button on the main screen, allowing users to navigate to configuration settings. The app can read the proper value parameter from the table – assuming the current user is a Contributor:
| Role | AdminIconVisible | ConfigPageVisible | CreateContact | UpdateContact | DeleteContact |
|---|---|---|---|---|---|
| Visitor | false | false | false | false | false |
| Contributor | false | false | true | true | false |
| AppAdmin | true | true | true | true | true |
Where the row and column meet, the value is taken (in this case false) and used to configure the Visible property of the corresponding button according to the role of the current user.
What about Power Automate?
Just like PowerApps, Power Automate uses connectors too, which means that Power Automate Flows can identify roles the same way as described above. However, there is a significant difference. Visual UI elements, which can be configured based on the current user’s role, make implementing an Identity Management system much easier than a Power Automate Flow without any visual UI elements that gets executed ‘under the hood’ (means invisible to the current user).
But this does not mean there are no use cases for Identity Management in Power Automate. Think of a Document Approval workflow where Power Automate needs to find the approver based on the document’s metadata (department, client, project, …) and kick off the approval process.
Here is another example: let us assume there is a CRM system that contains clients and theiraddresses. Client data records can only be updated from their associated client executive. Let us further assume that a Power Automate Flow is used to look up the client’s address in an official external address repository (like AddressComplete offered by Canada Post) and update the address. In this case, the Flow needs to check if the user who triggered the address update manually is the designated Client Executive responsible for that specific client. Otherwise, the Flow should not update the customer’s record. It could even send a notification to the user that updates are prohibited. In essence, this works the same way as described before. There are at least two (2) options to implement this in Power Automate.


Figure 6: Utilizing the Office365Groups connector Figure 7: Utilizing the Azure AD connector
In this case, utilizing the Azure Active Directory connector is the more elegant solution as there is an activity that allows looking up a specific user. The Office365Groups connector requires an additional step to look up the user’s record in the response. However, the Azure Active Directory connector might require additional privileges, preventing it from being used in a shared Flow.
Theoretically, the Power Automate Flow could use the owner of the data record based on the assumption, that the owner is also the responsible Client Executive. I do not consider this a fair assumption as Client Executives can change, while the owner field wasn’t updated when the Client Executive changed. The more secure option is to use Azure Active Directory groups.
Summary
Identity Management has become an essential requirement for many professional Power Platform applications. Although the built-in support for Identity Management cannot be called extensive, it is still possible to implement complex role-permission relations in a Power Platform application. It only takes a few Azure Active Directory groups, an approved list of roles and functionality and a skilled developer who knows how to implement the requirements best.
A professional Identity Management system can even include Azure B2C and external Identity Providers (Reference), but this might be covered in a separate blog post.
PowerApps started some years ago as a platform for no-code development but soon evolved into a platform that many organizations of different sizes use to create professional and complex applications. An intelligent combination of connectors, built-in functionality and other M365 services provide developers with exciting options to develop in-house applications that fill in gaps in organizational business requirements.
Subscribe to our blog