


Docker Tutorial Series, Part 1: An Introduction | Docker Components
- May 01, 2014
Docker, the new trending containerization technique, is winning hearts with its lightweight, portable, “build once, configure once and run anywhere” functionalities. This is part one of Flux7’s Docker tutorial series. As we move forward, together, we will learn and evaluate how Docker makes a difference, and how it can be put to the best use. Let’s learn Docker and nail it in less than six to seven weeks.
Docker Features
This part deals with the basics of Docker: its features, concepts and installation to get you onboarded with Docker.
Docker offers quite a number of interesting features which you will better understand as we maneuver through the tutorial series. However, a short list of docker features include:
- Extremely fast and elegant isolation framework
- Inexpensive
- Low CPU/memory overhead
- Fast boot/shutdown
- Cross cloud infrastructure
Docker Components & Elements
Docker has three components and three basic elements. Check out this video to get a quick grasp of the Docker components and elements, and their relation to one another.
Defining Components & Elements
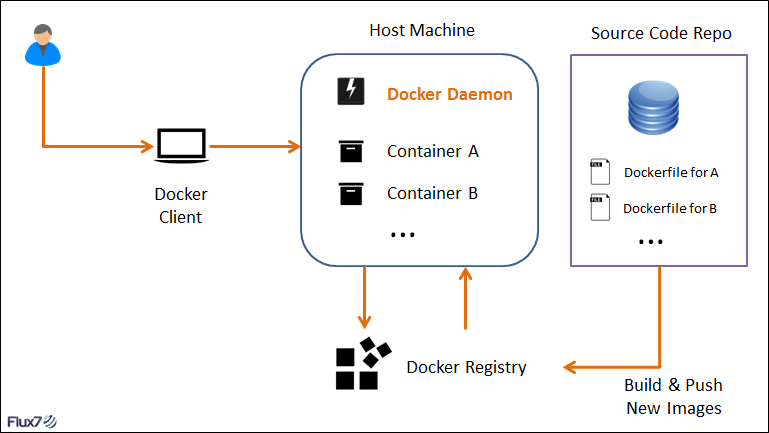
Docker Client is the user interface that allows communication between the user and the Docker daemon.
Docker Daemon sits on the host machine answering requests for services.
Docker Index is a centralized registry allowing backup of Docker container images with public and private access permissions.
Docker Containers are responsible for the actual running of applications and includes the operating system, user added files, and meta-data.
Docker Images are ready-only templates that help launch Docker containers.
DockerFile is a file housing instructions that help automate image creation.
Before discussing how Docker components and elements interact, let’s talk about what constitutes the pillars of Docker.
Docker uses the following operating system features for efficient containerization:
- Namespaces serve as the first level of isolation. Makes sure a process running in a container cannot see or affect processes running outside the container.
- Control Groups, the key component of LXC, have resource accounting and limiting as their key functionality.
- UnionFS (FileSystem) serves as a building blocks of containers. It creates layers, and, thereby, accounts for Docker’s lightweight and fast features.
How the Puzzle Fits Together
To run any application, there is a basic requirement of two steps:
Step 2: Run the container.
The initiation of these steps is fired using commands from the Docker Client. Docker Client is launched using the docker binary. At the basic level, Docker Client intimidates Docker Daemon regarding the image that needs to be created and the commands that need to be run inside the container. So after the signal to create an image is captured by the Daemon, these steps must be followed:
Step 1: Build an Image
As mentioned before, Docker Image is a read-only template to build containers. An image holds all the information needed to bootstrap a container, including what processes to run and the configuration data. Every image starts from a base image, and a template is created by using the instructions that are stored in the DockerFile. For each instruction, a new layer is created on the image.
Once images are created, they can be pushed to the central registry, the Docker Index, and made available for use by others. However, the Docker Index provides two levels of access permissions to images: public and private. You can store images privately by using the private repositories, which is one of the pricing plans offered by Docker. Based on the number of private repositories needed, the cost ranges between $7 and $50 per month. In short, public repos are searchable and re-usable, whereas private repos are only accessible to the members who have permissions. Docker Client can be used to search for images in the Docker Index.
Step 2: Run the Container
Running the container originates from the image we created in the previous step. When a container is launched, a read-write layer is added to the top of the image. After appropriate network and IP address allocation, the desired application can now be run inside the container.
If you are still a little confused, sit back, then watch for the practical examples we will be sharing with you during the coming weeks of this tutorial series.
A basic understanding suffices for now. So, let’s go ahead and install Docker!
Installing Docker: A Quick Guide
Step 1 – Check for https compatibility of the APT system.
Install the apt-transport-https package if the /usr/lib//apt/methods/https file doesn’t exist
Step 2 – Add the Docker Repository key to the local keychain.
Repository key: hkp://keyserver.ubuntu.com:80 –recv-keys 36A1D7869245C8950F966E92D8576A8BA88D21E9
Step 3 – Add the Docker Repository to the apt sources list.
Step 4 – Install the lxc-Docker package.
Step 5 – Verify the installation.
Many Docker enthusiasts are evolving their container strategies to address microservices. Read more about Docker and microservices here.
Get Started with AWS
Receive AWS tips, DevOps best practices, news analysis, commentary and more. Sign up for our IT Modernization blog here and set your topic and frequency preferences. Or, download our guide on getting started with AWS, establishing a secure AWS enterprise architecture with Flux7 Landing Zones.
Subscribe to our blog