


Virtual Private Cloud VPC Best Configuration Practices
- January 22, 2014
As we at Flux7 Labs AWS partners work on deployments for our customers, many ask questions about basic AWS security issues, including those addressed by using Virtual Private Clouds (VPCs). So in this post, we provide a guide for setting up and using VPCs in order to help guide your AWS setup. This AWS VPC tutorial is based on our experience from using VPN in AWS deployments both for Flux7 Labs’ internal systems and for our customers’ systems. VyScale, our cost- and performance-management solution, is an excellent tool for setting up systems inside of VPCs.
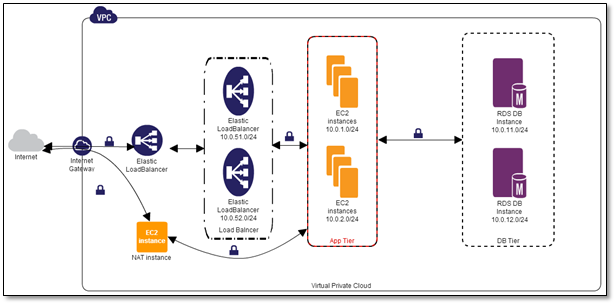
A VPC is a virtual network dedicated to your AWS account that’s logically isolated from other virtual networks in the AWS cloud. You can launch your AWS resources, such as Amazon EC2, RDS, ElasticCache and other instances into your VPC.
For information about the number of VPCs, you can create, see Amazon VPC Limits.
AWS VPC Setup
-
Create VPC
Log in to the AWS console.
Navigate to Services->VPC->Your VPCs.
Click “Create VPC”.
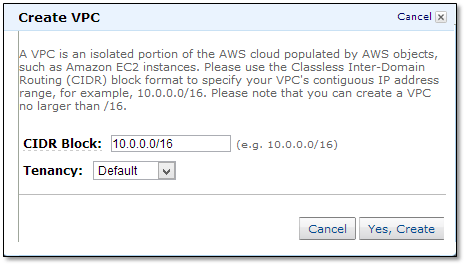
When you create an Amazon AWS VPC, you specify a set of IP addresses in the form of a Classless Inter-Domain Routing (CIDR) block (for example, 10.0.0.0/16). For more information about CIDR notation and what “/16” means, see Classless Inter-Domain Routing.
You can assign a single CIDR block to a VPC. The allowed block size is between a /28 netmask and /16 netmask. In other words, the VPC can contain from 16 to 65,536 IP addresses.
You cannot change a VPC’s size after creating it. If your VPC is too small for your needs, you’ll need to terminate all of the instances in the VPC, delete it, and then create a new, larger VPC.
To create your VPC, go to the Create VPC dialog box, specify the following VPC details and then click “Yes, Create”.
CIDR Block: Specify the CIDR block for your VPC. I prefer 10.0.0.0/16.
Tenancy: Default tenancy: This is for running instances on shared hardware and is is free of charge.
Dedicated Tenancy: This is for running your instances on single-tenant hardware. A $2 fee applies for each hour in which any dedicated instance is running in a region.
-
Creating Subnets
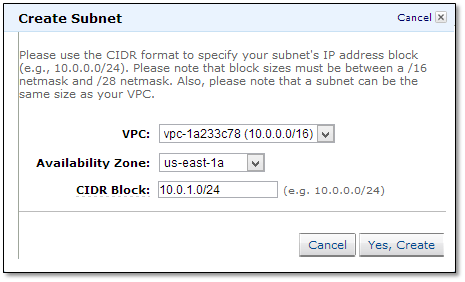
In the navigation pane click on “Subnets”.
Click “Create Subnet”.
Before we create a subnet, let’s understand the best practices for creating them.
You should create subnets across multiple availability zones, with each subnet residing within a single zone. Creating subnets in and launching instances across multiple availability zones will ensure a high-availability environment.
When creating separate subnets for ELB, EC2 and RDS instances, each tier should have at least 2 subnets across availability zones.
For this example, we created subnets using zones us-east1b and us-east-1d. These subnets are called “private subnets” because the instances we launch are not accessible from the Internet. In other words, these instances don’t have a public IP unless you assign an EIP.
App Tier: 10.0.1.0/24(zone-b), 10.0.2.0/24(zone-d)
ELB: 10.0.51.0/24(zone-b), 10.0.52.0/24(zone-d)
Database (RDS): 10.0.11.0/24(zone-b), 10.0.12.0/24(zone-d)
Always choose the same Amazon Availability Zones for all tiers. For example, if you choose two zones for high availability and use us-east-1a and us-east1b, then maintain those same 1a and 1b zones for all tiers. This will minimize data transfer charges because data transfers between instances within the same availability zone are free.
-
Create AWS Internet Gateway
By default, instances that are launched into a VPC can’t communicate with the Internet. However, you can enable Internet access by attaching an Internet gateway to the VPC.
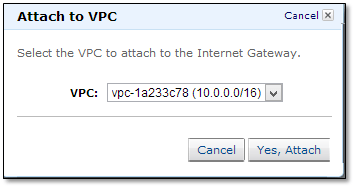
Go to Internet Gateways in the navigation pane and click “Create Internet Gateway”.
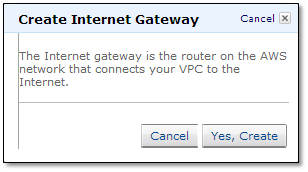
Now attach the gateway to a VPC by right-clicking on “VPC” and selecting “Attach to VPC”.
-
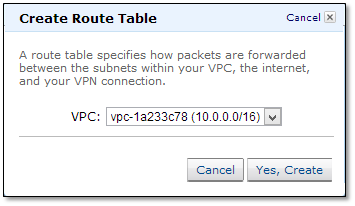
Create Route Tables
A route table contains a set of rules, called routes, that determine where network traffic is directed.
Each subnet in your VPC must be associated with a route table that will control that subnet’s routing. You can associate multiple subnets with a single route table; however, you can only associate a subnet with one route table.
Creating a VPC automatically creates a main route table which, by default, enables the instances in your VPC to communicate with one other.
Go to Route Tables in the navigation pane and click on “Create Route Table”.
As a best practice create separate route tables for each tier. This will provide more control in maintaining the security of each subnet.
Now associate the subnets to the route tables.
Click on one route table and go to the Associations tab.
Select the subnet and click “Associate”.

Associate each tier’s subnets separately to the dedicated route table.
Create 3 new route tables:
- ELB Route table—Associate 10.0.51.0/24 and 10.0.52.0/24.
- APP route table—Associate 10.0.1.0/24 and 10.0.2.0/24.
- RDS route table—Associate 10.0.11.0/24 and 10.0.12.0/24.
Do not associate any subnets with the main route table.
Now navigate to the main route table to add a route to allow Internet traffic to the VPC.
Go to Routes and specify the following values:
Destination: 0.0.0.0/0
Target: Select “Internet Gateway” from the dropdown menu.

- ELB Route table—Associate 10.0.51.0/24 and 10.0.52.0/24.
-
Create AWS Security Groups
This process is similar to creating an SG (Security Group) in classic EC2.
Create separate security groups for ELB, APP, DB (RDS) and NAT instances.
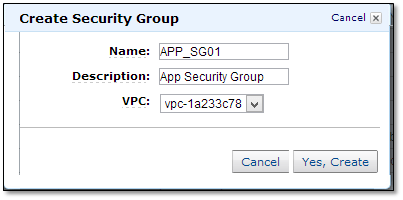
- APP_SG01
- NAT_SG01
- ELB_SG01
- DB_SG01
Allow Inbound rules for ELB, DB and APP to suit your needs. We’ll address NAT security group rules later in this post.
- APP_SG01
-
Create NAT instance
Instances launched into a private subnet in a VPC cannot communicate with the Internet unless you assign a public IP or EIP to the instance. However, assigning a public IP to an instance will allow everyone to initiate inbound Internet traffic.
Using a Network Address Translation (NAT) instance in your VPC enables instances in the private subnet to initiate outbound Internet traffic.
Create a subnet with netmask 10.0.0.0/24 for NAT instance. [Refer to section #2 of this post]. We call this subnet a “public subnet” and the others “private subnets”. While, technically, there is no difference between public or private subnet, for clarity we call publicly accessible instances public subnets.
Associate this subnet to the main route table. You can also create separate route tables to associate to the subnet. If you do create a separate route table, don’t forget to add a route that will allow Internet traffic into the subnet. [Refer to section #4 of this post].
Now navigate to Services->EC2->Launch Instance
In the Launch Wizard select “Community AMIs” and search for “ami-vpc-nat”. “ Select the first AMI from the results list to launch the instance into the VPC created in section #1. Choose the subnet 10.0.0.0/24 and then check the “Assign public IP” box. You can also assign an EIP, if needed. On the Configure Security Group page, choose “Select an existing security group” and select the NAT_SG security group that you created earlier.
For this example, we created a microserver.
Choose a NAT instance type based on your intended workload. If your application only occasionally needs to connect to the Internet and doesn’t require high network bandwidth, then a micro instance will suffice. If your application talks to the Internet continuously and requires better bandwidth, then start with m1.medium instances. You may need to upgrade the NAT instance to m1.large because network I/O varies between instance types.
Now, deselect the “Source/Destination” check box, right click on the NAT instance, select “Change Source/Dest. Check”, and click on “Disable”.
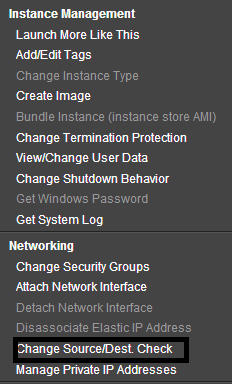
The NAT instance must be able to send and receive traffic from sources or destinations other than itself, so you’ll need to deselect the “source/destination” check boxes.
You can find more details here
Now navigate to Security Groups to add rules for inbound traffic.
Go to the Inbound tab for NAT_SG01. These rules will allow app servers to talk to the NAT instance on the 80 and 443 ports.
- Select “HTTP” from the Create a new rule list. In the Source box, specify the IP address range of your private subnet (App server subnets) and then click “Add Rule”.
- Select “HTTPS” from the Create a new rule list. In the Source box, specify the IP address range of your private subnet, and then click “Add Rule”.
Click “Apply Rule Changes”.
Now navigate to Route Tables and select the private subnets 10.0.1.0/24 and 10.0.2.0/24.
On the Routes tab, specify 0.0.0.0/0 in the Destination box, specify the instance ID of the NAT instance in the Target box, and then click “Add”.

If you don’t need an additional instance for NAT, you can minimize cost by assigning a public IP to the instance that needs Internet access. That will allow the instance to access the Internet directly.
- Select “HTTP” from the Create a new rule list. In the Source box, specify the IP address range of your private subnet (App server subnets) and then click “Add Rule”.
-
Create App Servers
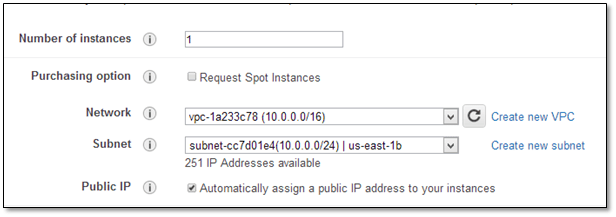
Now go to Services->EC2 ->Launch Instance.
On the Configure Instance Details page, from the Network list choose the VPC that you created previously and select your app server subnet (10.0.1.0/24, 10.0.2.0/24) from the Subnet list.
Optional: Select the “Public IP” checkbox to request that your app instance receive a public IP address. This is required when you don’t have a NAT instance, but your instance requires Internet access.
On the Configure Security Group page, select the option “Select an existing security group” and then select the APP_SG01 security group that you created previously. Click “Review and Launch”.
Now log in to the server and check to see whether or not you can access the Internet.
$ ping google.com
You now might ask, “How can I access from my desktop an instance that was created in a private subnet and has no assigned public IP?” The answer is that you can’t. To do so, you’ll need a bastion box in the public subnet. You can use a NAT instance as a bastion server (also known as a jump box).
Log in to the bastion (NAT) server first. You can access any instance from this server that was created in a private subnet.
For more details, see here.
-
Create RDS
Navigate to Services->RDS
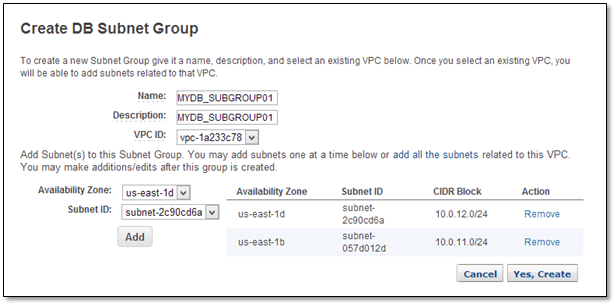
Go to Subnet Groups in the navigation pane and click “Create DB Subnet Group”.
Select the VPC ID from the drop down menu.
Select “Availability Zone” and choose the Subnet IDs of 10.0.11.0/24 and 10.0.12.0/24. Then click “Add”
Click “Yes, Create” to create the subnet group.
Creating an Options Group and a Parameters Group is similar to doing so in classic EC2.
Launch an RDS instance within the subnet group created above.
In the Additional Config window, select the VPC and DB Subnet Groups created previously.
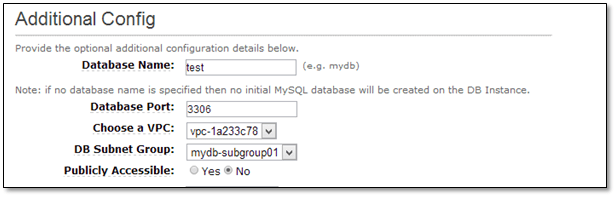
To make sure that your RDS instance is launched in subnets 10.0.11.0/24 and 10.0.12.0/24, select the “mydb-subgroup01” subnet group.
All other steps for creating an RDS are as usual.
-
Create ELB
Now it’s time to create the amazon load balancer. The load balancer will be the frontend and will be accessible from the Internet, which means that the ELB will be launched in public subnets 10.0.51.0/24 and 10.0.52.0/24.
At this point, the two subnets can’t access the Internet. To make them public subnets, update the route table that these subnets are associated to.
Navigate to Services->VPC->Route Tables
Select the ELB route table.
On the Routes tab, specify 0.0.0.0/0 in the Destination box, select the Internet gateway in the Target box, and then click “Add”.
Navigate to Services-> EC2-> Load Balancers
Click “Create Load Balancer”.
In the Launch Wizard, select “Create LB inside” as your VPC ID.
Do not select “Create an internal load balancer”.
Click “Continue”
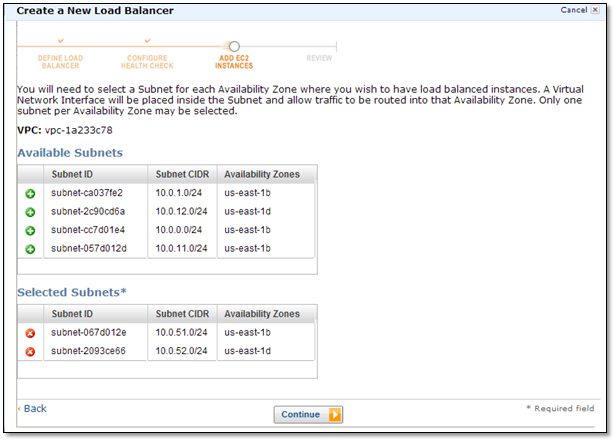
In Add EC2 Instances select the subnets where you want the load-balanced instances to be. Select 10.0.51.0/24 and 10.0.52.0/24.
In the next window select ”Choose from your existing security group” and then select the ELB_SG01 security group that you created previously. Click “Continue”.
In the next window select the App servers. Click “Continue”.
Review the details and click “Create”.
Make sure that you’ve enabled the APP_SG01 inbound ports (80/443) to ELB_SG01 so that the ELB can route traffic to backend app servers. Also make sure that ELB_SG01 HTTP and HTTPS ports are publicly accessible (0.0.0.0/0).
Subscribe to our blog